To watch an IP camera on a PC, connect the camera to the network and use compatible software. Ensure the camera’s IP address is correctly configured.
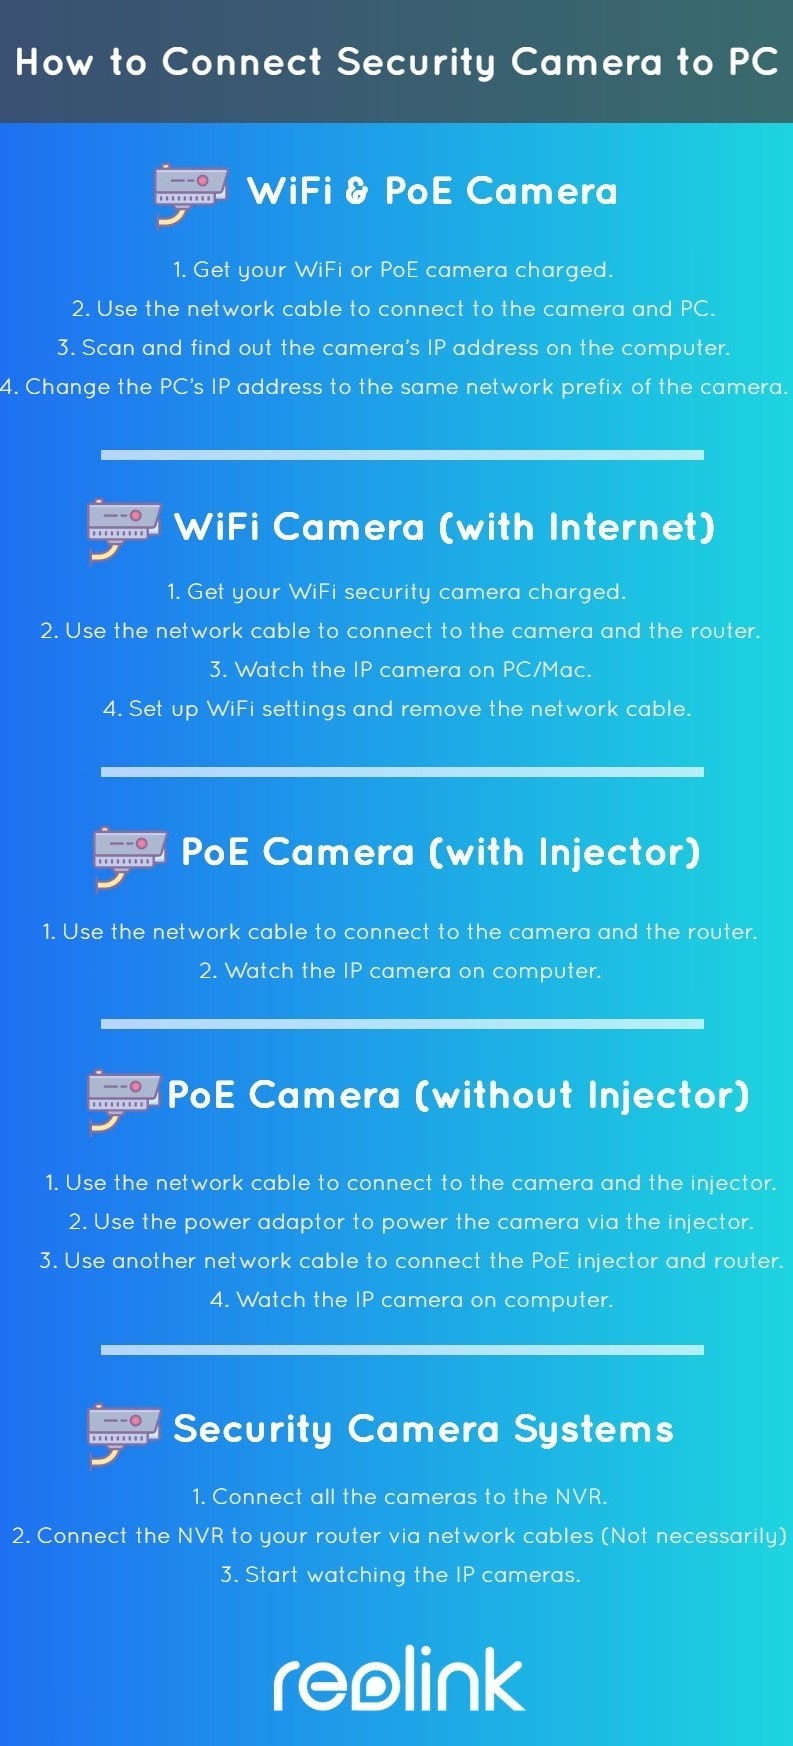
IP cameras provide enhanced security and remote monitoring capabilities. Many homeowners and businesses use IP cameras for surveillance. Setting up these cameras on your PC involves a few straightforward steps. First, connect the camera to your network, either via Wi-Fi or Ethernet.
Next, find the camera’s IP address, which is usually available in the camera’s manual or through a network scanning tool. Install the appropriate software, often provided by the camera manufacturer, or use third-party applications like VLC Media Player. Once configured, you can easily monitor the camera’s feed directly from your computer.

Necessary Equipment
To watch your IP camera on a PC, specific equipment is needed. This equipment ensures smooth video streaming and easy access. Below, we will discuss the essential items required.
Ip Camera Basics
An IP camera is a digital video camera. It sends and receives data via a network. Unlike traditional cameras, IP cameras do not need a local recording device. They use the internet to stream live footage. This makes them convenient for remote monitoring.
Required Hardware For Pc
Watching an IP camera on a PC requires some basic hardware. Here’s what you need:
- IP Camera: The core device for capturing video footage.
- PC: A computer to watch and manage the camera feed.
- Router: Connects the IP camera and PC to the internet.
- Ethernet Cable: For wired connections between the camera and router.
- Power Adapter: Supplies power to the IP camera.
Below is a table summarizing the necessary hardware:
| Hardware | Purpose |
|---|---|
| IP Camera | Captures and streams video |
| PC | Displays and manages video feed |
| Router | Connects devices to the internet |
| Ethernet Cable | Wired connection for stable network |
| Power Adapter | Provides power to the camera |
Ensure all these items are available and properly set up. This will guarantee a smooth and reliable viewing experience on your PC.
Software Options
Choosing the right software is key to watching your IP camera on a PC. Various software options offer different features, making your experience seamless and efficient.
Popular Ip Camera Software
There are several popular IP camera software options available for PC users. Here’s a quick overview:
- Blue Iris: Offers motion detection and alert features.
- iSpy: Known for its open-source platform and flexibility.
- Xeoma: User-friendly with a drag-and-drop interface.
- Netcam Studio: Provides remote access and cloud storage.
Free Vs Paid Solutions
Choosing between free and paid solutions can impact your experience. Here are some points to consider:
| Criteria | Free Solutions | Paid Solutions |
|---|---|---|
| Cost | Zero cost, no fees | Subscription or one-time fee |
| Features | Basic functionality, limited features | Advanced features, premium support |
| Updates | Occasional updates | Regular updates, new features |
| Support | Community support, forums | Dedicated support, faster response |
Free solutions like iSpy and ContaCam offer basic features. Paid solutions such as Blue Iris and Netcam Studio provide advanced functionality and premium support.
Understanding your needs can help you choose the right software. Whether you opt for a free or paid solution, ensure it meets your requirements.
Installation Guide
Are you ready to watch your IP camera on your PC? Follow this installation guide to set up your camera quickly. This guide covers downloading software and setting up your IP camera.
Downloading Software
First, you need to download the software to view your IP camera. Use the software provided by your camera manufacturer. Usually, you can find it on their website.
Here are the steps:
- Visit the camera manufacturer’s website.
- Go to the support or download section.
- Find the software compatible with your camera model.
- Click the download link and save the file to your PC.
- Open the downloaded file and follow the installation instructions.
Setting Up The Ip Camera
Now, it’s time to set up your IP camera. Follow these simple steps:
- Connect your IP camera to your network. Use an Ethernet cable or Wi-Fi.
- Power on your IP camera.
- Open the installed software on your PC.
- Look for an option to add a new camera.
- Enter your camera’s IP address and login details.
- Save the settings and check the live feed.
Use the table below to note down important information:
| Information | Details |
|---|---|
| Camera IP Address | Your camera’s IP address |
| Username | Your camera login username |
| Password | Your camera login password |
Once you complete these steps, you can watch your IP camera on your PC. Enjoy the live feed and secure your surroundings effortlessly.
Connecting Ip Camera To Pc
Want to watch your IP camera on your PC? This guide will help you. Learn to connect your IP camera to your PC with ease. Follow our steps for both wired and wireless connections.
Wired Connection Steps
- Gather Your Equipment: You will need an Ethernet cable and your IP camera.
- Connect the Ethernet Cable: Plug one end into the camera and the other into your router.
- Power the Camera: Ensure your camera is connected to a power source.
- Install Software: Download and install the camera software from the manufacturer’s website.
- Open the Software: Launch the software on your PC.
- Add the Camera: Follow the software prompts to add your camera. Enter the camera’s IP address when prompted.
- View the Feed: Once added, you can see the live feed from your camera.
Wireless Connection Steps
- Ensure Wi-Fi Availability: Check if your camera and PC are on the same Wi-Fi network.
- Power the Camera: Connect your IP camera to a power source.
- Install Software: Download the required software from the camera manufacturer’s website.
- Open the Software: Launch the installed software on your PC.
- Go to Wireless Settings: Within the software, navigate to the wireless settings.
- Add the Camera: Follow the prompts to add the camera using the Wi-Fi network. Enter the camera’s IP address if asked.
- View the Feed: Once connected, you can watch the camera feed live.
By following these steps, you can easily connect your IP camera to your PC. Whether using a wired or wireless connection, the process is straightforward. Enjoy monitoring your space from the comfort of your PC.
Configuring Software Settings
After setting up your IP camera hardware, configuring software settings is crucial. This step ensures you get the best performance. Proper configurations enhance video quality and security. Below, we will explore key settings.
Adjusting Resolution
Resolution greatly affects video quality and storage. Higher resolution offers clearer images but uses more space. Follow these steps to adjust resolution:
- Open the IP camera software on your PC.
- Navigate to the Settings menu.
- Select Video Settings.
- Choose your preferred resolution. Common options are 720p, 1080p, and 4K.
- Click Save to apply changes.
Use the table below for a quick guide on resolution and storage needs:
| Resolution | Video Quality | Storage Usage |
|---|---|---|
| 720p | Good | Low |
| 1080p | Better | Medium |
| 4K | Best | High |
Setting Up Alerts
Alerts notify you of any unusual activity. Setting up alerts helps you stay informed. Follow these steps to set up alerts:
- Open the IP camera software on your PC.
- Go to the Settings menu.
- Select Alert Settings.
- Choose the type of alert you prefer. Options include email, SMS, and app notifications.
- Enter your contact details and click Save.
Review the table below for alert types and their benefits:
| Alert Type | Notification Speed | Ease of Use |
|---|---|---|
| Moderate | Easy | |
| SMS | Fast | Moderate |
| App Notification | Instant | Easy |

Troubleshooting Tips
Watching your IP camera on a PC can be tricky. Sometimes, things don’t work as planned. Here are some helpful troubleshooting tips to solve common problems.
Common Connection Issues
Connection issues are common with IP cameras. They can be frustrating. Here are some common problems and solutions.
- Check Cables: Ensure all cables are connected properly.
- Reboot Devices: Restart your PC and the IP camera.
- IP Address: Verify the IP address settings.
- Network Configuration: Ensure the camera is on the same network.
Software Compatibility Problems
Sometimes, software issues can prevent your IP camera from working. Here are some tips to resolve them.
| Problem | Solution |
|---|---|
| Outdated Software | Update your software to the latest version. |
| Unsupported Software | Check if the software supports your IP camera model. |
| Firewall Settings | Adjust your firewall settings to allow the software. |
| Driver Issues | Ensure all drivers are up-to-date. |
By following these troubleshooting tips, you can solve most issues. This ensures you can watch your IP camera on your PC without problems.
Advanced Features
Discover the advanced features that make watching IP cameras on your PC more effective. These features enhance security, flexibility, and usability. Learn how remote access, recording options, and playback features can optimize your surveillance experience.
Remote Access
Remote access allows you to view your IP camera from anywhere. You can use your smartphone, tablet, or another PC. This feature is crucial for monitoring your property while you are away. It offers peace of mind and convenience.
- Live Streaming: Watch real-time footage from your camera.
- Multiple Device Support: Access from different devices simultaneously.
- Secure Connection: Uses encrypted connections for safety.
Recording And Playback Options
Recording and playback features let you save and review footage. These features are essential for capturing important moments and evidence. You can choose various recording modes and playback options.
| Feature | Description |
|---|---|
| Continuous Recording | Records footage non-stop for complete coverage. |
| Motion Detection | Starts recording when motion is detected. |
| Scheduled Recording | Records during pre-set times. |
Playback options include:
- Timeline View: Easily scroll through recorded footage.
- Event Search: Quickly find recordings based on events.
- Export Clips: Save important footage to your PC.

Frequently Asked Questions
How To Connect Ip Camera To Pc?
To connect an IP camera to your PC, use the camera’s IP address. Access it through a web browser or camera software. Ensure both devices are on the same network.
Can I View Ip Camera Remotely On Pc?
Yes, you can view an IP camera remotely by configuring port forwarding. Use the camera’s software or a dedicated app to access it from anywhere.
Do I Need Software To Watch Ip Camera On Pc?
Yes, you typically need software to watch an IP camera on your PC. Many cameras come with proprietary software. Alternatively, use third-party software like VLC or Blue Iris.
What Are The Best Software For Ip Camera Viewing?
Popular software for IP camera viewing includes Blue Iris, iSpy, and VLC. These programs offer various features like recording, motion detection, and remote access.
Conclusion
Mastering how to watch IP cameras on your PC enhances security and convenience. Follow the steps provided for seamless access. Utilize reliable software and ensure your system meets requirements. Stay vigilant with updates to maintain functionality. Enjoy improved surveillance and peace of mind with your IP camera setup.


