To connect your CCTV camera to a monitor without a DVR, begin by collecting a compatible monitor, power adapter, BNC cable, and a BNC to HDMI or VGA converter. Confirm that your camera and monitor have matching signal types and resolutions. Connect the BNC cable from the camera to the converter, then link the converter to your monitor using an HDMI or VGA cable. Power on both the camera and monitor. Check your monitor’s input settings to confirm the camera feed appears. If you encounter issues, double-check connections, power supplies, and cables. Now, let’s explore more details and options.
Gather Necessary Equipment
To connect your CCTV camera to a monitor without a DVR, you’ll need to gather the necessary equipment first. Don’t worry, it’s simpler than you might think, and you’ll love the freedom it offers. Start with a CCTV camera, ensuring it’s powered up and ready. Next, you’ll need a power adapter suited for your camera model. A compatible monitor is essential; one with HDMI or VGA inputs usually works best.
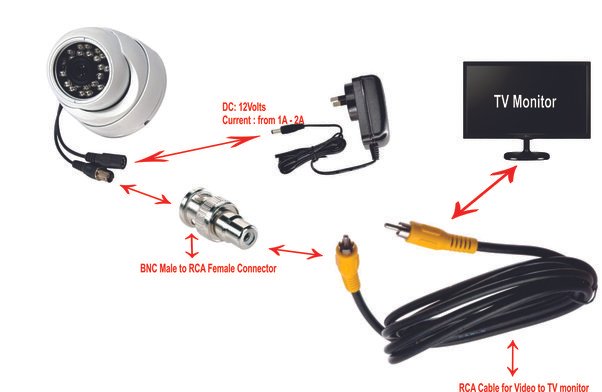
You’ll also require a BNC to HDMI or BNC to VGA converter, depending on your monitor’s input type. This device translates the camera’s signal into something your monitor can display. Don’t forget the appropriate cables: a BNC cable to connect your camera to the converter, and either an HDMI or VGA cable to link the converter to your monitor.
Lastly, consider a power strip with surge protection to safely manage all these connections. Gather these tools, and you’ll be ready to set up your system. Taking control of your surveillance setup without the constraints of a DVR is empowering, letting you tailor your security to your unique needs and lifestyle. Happy connecting!

Check Camera Compatibility
Confirm that your CCTV camera is compatible with the monitor and the chosen converter before proceeding with the setup. Ensuring compatibility is essential to avoid any frustrating hiccups later on. First, check the output signal of your CCTV camera. Most cameras use analog signals like CVBS, AHD, TVI, or CVI, while others might employ digital signals like IP. Your monitor and converter need to support the same signal type.
Next, verify the resolution compatibility. If your camera outputs at 1080p but your monitor only supports 720p, you won’t get the best picture quality. Make sure both devices can handle the same resolution.
Here’s a quick compatibility checklist:
| Component | Feature | Check |
|---|---|---|
| Camera | Signal Type | Analog (CVBS, AHD, TVI, CVI) / Digital (IP) |
| Monitor | Signal Type Support | Matches Camera’s Signal Type |
| Camera | Resolution | 720p, 1080p, 4K |
| Monitor | Resolution Support | Matches Camera’s Resolution |
Choose the Right Cables
Selecting the appropriate cables is essential for guaranteeing a seamless connection between your CCTV camera and monitor. You need to choose cables that match your camera’s output and your monitor’s input. This step is vital for maintaining picture quality and ensuring reliable performance.
First, identify the type of connectors your CCTV camera and monitor use. Most CCTV cameras use either BNC or RCA connectors for video output. Your monitor might have HDMI, VGA, or RCA inputs. Knowing these details will help you pick the right cable.
Here are three common cable types you might need:
- BNC to RCA Cable: If your camera has a BNC output and your monitor has an RCA input, this cable will directly connect the two.
- HDMI Cable: For modern monitors with HDMI inputs, consider a BNC to HDMI converter to utilize this high-quality connection.
- VGA Cable: If your monitor supports VGA, you can use a BNC to VGA converter to connect your camera.
Double-check your cable lengths to ensure they’re long enough to span the distance between your camera and monitor. Choosing the right cables gives you the freedom to set up your surveillance system without unnecessary hassles.
Find Power Supply Options
When setting up your CCTV camera and monitor, ensuring they have a dependable power supply is essential for uninterrupted operation. First, you’ll need to identify the power requirements for both devices. Most CCTV cameras use a 12V DC power supply, while monitors typically require 110V AC. Make sure you check the specifications for your particular models to avoid any mishaps.
Next, consider using a centralized power supply box if you’re planning to install multiple cameras. This option allows you to power all cameras from a single source, reducing clutter and simplifying maintenance. If you’re only setting up one or two cameras, individual power adapters will work just fine.
Another option is Power over Ethernet (PoE). If your camera supports PoE, you can use a single Ethernet cable to provide both power and data, eliminating the need for separate power cables. This is a great choice if you want a clean, streamlined setup.
Don’t forget about battery backups or Uninterruptible Power Supplies (UPS) for added reliability. These can keep your system running during power outages, ensuring continuous surveillance.
Connect the Camera
With a reliable power supply in place, you can now connect the CCTV camera to your monitor. This process is straightforward, allowing you the freedom to quickly set up your surveillance system without relying on additional equipment. Here’s how to do it:
- Verify the cables: Confirm you have the right cables for the job. Typically, these will be BNC connectors and coaxial cables. If your monitor doesn’t support BNC, you might need a BNC to HDMI or VGA adapter.
- Connect the camera to the monitor: Attach one end of the coaxial cable to the camera’s output port and the other end to your monitor’s input port. Use the BNC connectors to secure the connection. Make sure it’s snug to avoid any signal loss.
- Power on the camera: Plug the camera into the power supply and turn it on. You should see the camera’s feed appear on your monitor. If not, double-check all connections and ensure they’re secure.
Set Up the Monitor
Now that your camera is connected, let’s focus on setting up the monitor to make sure you get the best possible view of your surveillance feed. Start by placing your monitor in a location that offers the most convenience and visibility. You don’t want to feel restricted when you’re keeping an eye on things.
Next, plug the monitor into a power source and use the appropriate video cable—HDMI, VGA, or RCA—to connect it to the camera. Make certain the cable is securely attached to avoid any interruptions in the feed. Turn on the monitor and switch to the correct input channel. It might take a moment for the feed to appear, so be patient.
Adjust the brightness and contrast settings on your monitor to get a clear and crisp image. This step is vital; you need to make sure that the display isn’t too dark or too washed out. You want to see every detail without straining your eyes.
Adjust Camera Settings
After setting up your monitor, focus on adjusting the camera settings to guarantee the best surveillance performance. Start by accessing the camera’s menu using the control buttons or the remote control provided. Here’s a quick guide to get you started:
- Resolution and Frame Rate: Choose the highest resolution and frame rate your camera supports. Higher resolution ensures clearer images, and a higher frame rate captures smoother video. This is important for identifying details and ensuring nothing goes unnoticed.
- Brightness and Contrast: Adjust these settings to enhance the video quality. Too much brightness can wash out the image, while too little makes it hard to see. Contrast should be balanced to distinguish between different elements in the footage.
- Motion Detection: Enable motion detection if your camera supports it. This setting conserves storage and makes it easier to review footage by only recording when motion is detected. You can usually adjust the sensitivity to avoid false alarms from minor movements.
Take control of these settings to tailor your surveillance system to your needs. By doing so, you’ll make sure that your camera performs excellently, providing you with the peace of mind and freedom to live without constantly worrying about your security.
Test the Connection
Confirm the connection between your CCTV camera and monitor is functioning correctly by powering on both devices and checking the video feed. Make sure the camera is positioned to capture the desired area. Switch on the monitor and cycle through the input options until you see the camera’s live feed. If everything is connected right, the video should appear on the screen instantly.
Take a moment to inspect the video quality. Make certain the image is clear and the camera is capturing everything you need. If the picture is blurry or out of focus, you might need to adjust the camera lens. Walk around the area being monitored to check for any blind spots. This way, you ascertain that all critical areas are covered.
Troubleshoot Common Issues
If you encounter any issues with the connection, start by checking the cables and making sure they are securely plugged in. Loose connections are often the culprit behind a blank monitor or poor image quality. Once you’ve verified this, move on to the following steps to troubleshoot common problems:
- Check Power Supply: Confirm that both the camera and the monitor are receiving power. Sometimes, a simple oversight like a disconnected power cable can cause the entire system to fail.
- Verify Input Source: Ensure your monitor is set to the correct input source. If your monitor supports multiple inputs (HDMI, VGA, etc.), make sure you’ve selected the one connected to your CCTV camera.
- Inspect Video Cables: Look for any visible damage or wear on your video cables. Damaged cables can disrupt the video signal, resulting in a poor or nonexistent display.
If you’ve gone through these steps and the issue persists, you might need to test the camera with another monitor or try a different set of cables. Freedom in troubleshooting means not being afraid to experiment and swap out components until you pinpoint the problem. By methodically checking each part of your setup, you’ll maximize your chances of a successful and smooth connection.
Frequently Asked Questions
Can I Connect Multiple CCTV Cameras to One Monitor?
Yes, you can connect multiple CCTV cameras to one monitor. You’ll need a video multiplexer or a security system that supports multiple inputs. It’s straightforward and gives you the freedom to monitor everything from one screen.
What Are the Best Brands for Standalone CCTV Cameras?
You’re looking for the best standalone CCTV camera brands? Consider Arlo, Reolink, and Nest. They offer reliable performance, easy installation, and great features, giving you the freedom to monitor your space without any hassle.
How Can I Secure My CCTV Camera From Hacking?
You can secure your CCTV camera from hacking by updating firmware regularly, using strong, unique passwords, and enabling encryption. Don’t forget to disable remote access if you’re not using it. Stay vigilant and protect your freedom!
Is It Possible to View the CCTV Feed on My Smartphone?
Imagine your CCTV feed as a bird soaring into your smartphone’s screen. Yes, it’s possible! Use a Wi-Fi enabled camera and a compatible app. You’ll have real-time monitoring freedom right in your pocket.
What Are the Benefits of Using a Monitor Over a Dvr?
You’ll find using a monitor over a DVR gives you real-time access without complicated setups. You’re not tied down by recording limitations, and you can enjoy immediate viewing freedom whenever you need it.


